Friday, June 28, 2013

Toffeetastic

I must admit to having a big Amazon addiction! I can't help it, a love of books is a genetic condition in my family...  However, in this case a certain amount of blame must go to my lovely friend Helen, who had a copy of my latest purchase which I had a look through and totally fell in love with.  I was aware of this book as it's author Eric Lanlard is a favorite of mine, but having seen it in the flesh all my womanly resolve dissolved like hot sugar into cream!  So Amazon got more of my cash and I got Eric Lanlard's drool worthy new book Chocolat.  It is filled with gorgeous pictures and recipes that make your stomach rumble just reading them.  My first go was his Soft Chocolate Butter Toffee (see what I mean, even the name is yummy!).  Having braved fudge making  a few times I felt happy to tackle more boiling sugar and having ordered some liquid glucose specially from Ocado (how middle class am I!), I got to have a go.  The glucose is important as it makes the toffee beautifully smooth and not gritty.  The recipe does call for having three pans of ingredients being heated pretty much at the same time, so it is a little hectic, but as long as you've got everything measured out first it's fine.  If you have to weigh something in the middle of it I can see you easily burning the cream or sugar syrup. Toffee making is fairly similar to making fudge, in that you heat the sugar mix up to a specific point, as this is soft toffee you heat it to soft ball stage stirring like crazy, then let it cool slightly stir in the chocolate for flavour.  It is then poured into a lined cake tin and left to cool.  It makes a really creamy, chocolatey toffee, that is not too sweet as the chocolate used has a lot of cocoa solids in it.  I think this would make a lovely present to someone with a sweet tooth, so I may be making this a lot in the future!
Three pans all going! 
The Caramel being heated and finally the chocolate being stirred in.
The toffee poured into a baking tin to cool
Having cooled overnight it's much darker
Ready to cut up
Toffee Mountain!

Stored in a nice kilner jar.

Monday, June 24, 2013

Mini Pork Pie and Roses

Protected with clingfilm and with
the reed sitting in the valley
I'm really pleased with myself for having finally got the hang of this hat block! It was given to me by some of my lovely friends for a 30th birthday present, so finally managing to get to use it properly is wonderful. As you can see from the pic, its got a miniature pork pie rim at the top-just like the ones you get on pork pie hats as worn by, Buster Keaton (probably its most famous exponent), most of the band Madness and perhaps my favorite, Yogi Bear.  Its called a pork pie, because fairly obviously the ridge around the top of the crown looks like the one on the top of a pork pie.  The problem is when you pull a felt hood over a hat block it does not naturally conform to the valley round the top. I tried this block before, and well... it wasn't pretty, it was rather lumpy and it quickly got re-blocked into something else and the scary block went to the back of the cupboard!  However, I had read one way of blocking a neat pork pie was to use blocking reed. This is a thin piece of willow that when steamed or soaked becomes all bendy and soft, so it can be pinned into the valley to keep the felt in place without having to use every pin you own and still not get a neat job... However, blocking reed is not something that you find at your average craft shop... but finally I found a supply on line (Go to www.thetrimmingcompany.com and it's under millinery materials.  This is a great website for millinery materials). So having got some, I combined it with my marvelous pin pusher tool (that helps you to push pins accurately into the block when you don't have particularly strong hands), to finally get a nice smooth pork pie ridge - dead chuffed!
Starting to pin the reed into the valley
Steaming the felt to get the last of the wrinkles out.
The blocked felt removed from the block, the bottom part gets folded under to make a neat edge.
The completed felt hat on my dolly head.
I really like this small perching block it has a rather lovely 1940's feel, with its small size and pork pie detail. It is also incredibly versatile; you can wear it at so many different angles, as you can see below.
Just three options!
I wasn't quite sure how to decorate the hat as it is such a dark green (it was called moss green no the website, but dark sludge might have been a better description!)  In the end I went back to one of my favorite decorations-folded ribbon roses.  They fit so nicely into the valley that I just had to use them.  The photos are not great unfortunately as its only my iPhone... but I am planning on kidnapping one of my friends who is a photographer and having some fun taking proper pictures!
The finished hat
Side view

Tuesday, June 18, 2013

Leafy green button hat.

The green button hat mid-blocking.
I am really enjoying using up some of my felt hat blanks that I've had hanging about for a while, as I have promised not to buy more new ones until I've used some of my stash up!  This felt hat was one of a pair of green hoods I bought ages ago with a vague idea of making something leafy. I started by blocking the base of the hat with the lighter green felt on my button block (I use this block all the time, it forms the base of this hat and these ones too. Not bad for a bargain from Ebay!) .  The darker green felt I also blocked on another block so I could use the off cuts to make the leaf decoration for this hat (more on that in a later post...).  There is quite a bit of felt left over if you are using a small, perching block rather than a full head size one, and I always keep the off cuts to use as decorations on other hats.  I used a leaf template from one of my many books to cut a selection of leaves from both of the green felts and painted sizing onto the wrong side of the leaves so that I could shape them a bit as when they were flat they were a bit lifeless.  By pleating the base of the leaf and then steaming and shaping them over my tailors ham they looked much better and more interesting.  I had lots of fun pinning the leaves on to the hat in various different configurations before deciding on the final position of the group. I then raided my huge stash of beads, sequins, Swarovski crystals and all things shiny to find some extra decorative sparkle. I think this would make a lovely hat to wear to a summery wedding (assuming we ever get a summer!)  and I am thinking about doing another hat in reds and golds as an autumnal companion to this one.
The cut out leaves.
The completed hat.
I added a few sparkles to  make the back more interesting
The leaves from the left side
From the right side

Friday, June 07, 2013

Free form felt helmet

I've always been a bit wary of trying free form or hand blocking felt. Having CF has gradually stopped me doing many of the things that have defined my life.  I can no longer play the flute or sing as the deep breathing aggravates my lungs and starts them bleeding-nice! This means no more orchestras, bands, choirs or singing in shows.  I can't dance anymore for the same reason, so there goes teaching lindy and dancing four or five times a week and going away to lindy events.  I can't work as a wardrobe mistress anymore as I am just not strong enough and yet again my lungs cant take it, and my increased IV treatment means meeting deadlines for shows is impossible and even meeting wedding deadlines is very hard.  All this has meant that I have lost so many things that I love doing, that I defined my life with, because my stupid body simply can't cope with them, and I really, really, really hate this.  One of the few things that I still have left is sewing and particularly hat making.  So if I had tried free form blocking a hat and been rubbish at it I would have been so annoyed, as I need to still be able to do something creative and hopefully be good at it, or I would probably just go totally mad.  Fortunately, I think I managed pretty well at my first go...  phew!

Free form hat making is unlike normal hat blocking because you do not use a wooden block in the shape of the desired hat.  Instead, you use a head shaped block or stand and having steamed the felt you pull it into shape over the block then pull and pinch and twist it into whatever shape you want. I bought a malleable head block ages ago, but have only just steeled myself to finally try out free form blocking.  Technically, my head is a malleable block for making wigs on, but it works just as well as a more traditional balsa wood head shape, it was also less than half the price of a carved balsa head...  I used my kettle to utterly steam the blue felt cone, then pulled it over the head and off I went with the pins.  I found that you have to work really quickly as the felt soon cools and stops being so pliable and stretchy.  To begin with you can take the hood of the block and re-steam it on the kettle spout, but once it got lots of pins in it to keep the felt malleable I held the whole thing in the steam jet and also used a wet tea cloth and a normal steam iron to press the steam into the felt and keep it soft.  You've got to be really careful whilst doing this as not only is it very easy to steam your fingers but I even managed to get a face full of steam on a couple of occasions-not good!
The first few pleats and pins
More pleats, more pins...
Pretty much all the pins!
It is a very organic and rather mad process, as you do find yourself just making it up as you go along. When I started I had an idea inspired by a 1920's cloche that had a line of pleats running over the head from front to back, but as I pinned it sort of morphed into the pleats curing right round the head! It is also very difficult to stop and I did find myself wanting to just carry on adding more and more pleats and tucks until I ran out of felt! Once it was all pinned up I left it to dry completely, before gentle removing it from the block and painting the inside with hat size and repining it onto the block to dry again.  The size makes the felt far more firm and stops it loosing all the shapes you've made.  To further hold the shape in, I carefully sewed all the pleats into the hat. The good thing about felt is that its fairly easy to hide tiny stitches under the pile of the fabric.

The finished hat on my dolly head.
The sewn in pleats.
From the side.
I am rather pleased with how it turned out, and I am definitely trying free form blocking again.  I was rather amused however when bot my parents independently described it as a helmet for an alien in Dr Who! So it's got dubbed the blue helmet in my head now!  For once, I've actually done a couple of those daft self portraits of me wearing it, by holding my IPhone at arms length!  I did try some without my glasses on, but I'm that short sighted I really could not get it to focus properly!
Hat accessorized with the latest port needle and dressing...

Thursday, May 30, 2013

A little light chaos....

When people come to my workroom to try on a dress or a hat, or talk about commissioning something it really doesn't look like it does on an average day when I am making things.  When other people are about the room is tidy and organised, the tables are folded down small (marvelous design from IKEA halves in size) and as much as possible is moved into my bedroom to make it appear bigger and give more space.  When I am working however, it quickly clogs up with all sort of things, from feathers to patterns, not to mention various sewing machines and hat blocks. One of my friends was saying she would like to see my workroom (and have a play!), so I thought I would take some pictures.... I've tried to be fairly honest and not tidy up so that this is what it does look like for most of the time- semi organised mess!
Typical cluttered table... One sewing machine on the table, an over locker and two other machines underneath it... The blue felt hat on my malleable head block is nearly finished and my large embroidered hat is sitting on the large brim block at the back of the table, until I can figure out where to store it! The big cardboard box contains a new hat block (squee!)
The table from the other side.  Their is actually a bed underneath all the piles of stuff, so that the room can still be used as a  guestroom.  Although you'd have to dig it out from under the books, fabric, cushions, crochet and hat hoods that are currently covering it...
From this angle you can see the hanging rail that my Dad fixed up for me.  It currently has a load of costumes and dresses on it.  It also contains all the card pattern blocks I have drawn over the years- so useful in creating new designs. My new red kettle is sitting on it's hot plate, along with one of my full size irons and my mini iron, which is sitting in a mug to stop it burning the table top.
My super embroidery machine is on a movable table in front of the window where it gets the best light. I try and keep it covered to prevent dust getting into it.  Next to it is a movable set of drawers with lots of my embroidery threads on the top and loads of interfacing and fabric inside.
The shelves are totally crammed full of books and boxes of all sorts of things. The two big  boxes with handles on the top shelf contain a vast number of threads.  My books are probably my most important possessions along with my sewing machines.  When I'm feeling ill I spend a lot of time reading and my rather large collection of fashion history and costume is invaluable in keeping me sane and inspiring new projects.  They are is a sort of order, divided into historical books,dress making books, hat books and specific areas like corsetry or pattern cutting. 


Saturday, May 18, 2013

Boater and Bows

The boater is one of the simplest and widely used hat forms.  According to Wikipedia, fountain of all knowledge, 'It is normally made of stiff sennit straw and has a stiff flat crown and brim, typically with a solid or striped grossgrain ribbon round the crown'.  This may be where it started, but the boater has found fame in a huge number of incarnations from ladies elegant head wear, through barber shop quartet accessory, to school uniform staple.  This probably explains in part why the boater has so many different names, boater, basher, cady, can-can hat, Katie, Somer, sennit hat, or my personal favorite the 42nd street skimmer, according to P. G. Wodehouse!  I found a very charming version on the Metropolitan Museum Collection website, where I often spend a happy hour browsing through their fantastic costume and fashion collection. This version was a small red perching version, with black bow decoration made by Bergdorf Goodman in 1944.  It's a great example of the popular fashion of the 1930's and 40's for men's hat styles to be made in miniature for ladies  I had a red felt hood handy and a small round block to use for the crown.  I don't have any small brim blocks (yet!), so I thought I would try using  my tailors ham to block some shape into a flat felt circle for the brim (a tailors ham is a heavily stuffed shape that tailors use to press curves into collars etc).  I got a bit snap happy whilst making it, as I thought it would be nice to see the process of making as well as the end product, and to show how much work goes into each hat.
Materials
Having given the hood a really good steam I started pulling it into shape over the block.  As its a small block I cut the excess off the hood to use as the brim and to make it easier to pull round the block.
I needed to re-steam the shape, as the felt becomes less malleable as it cools, so I removed the felt from the block and held it back in the steam  then popped it back on the block and used a wide piece of elastic to hold the shape I'd already blocked whilst I dealt with the fold the felt around the bottom of the block.
Once I'd got all the felt pinned under I left the crown to dry overnight and marked the base line of the crown with chalk where I cut off the excess.
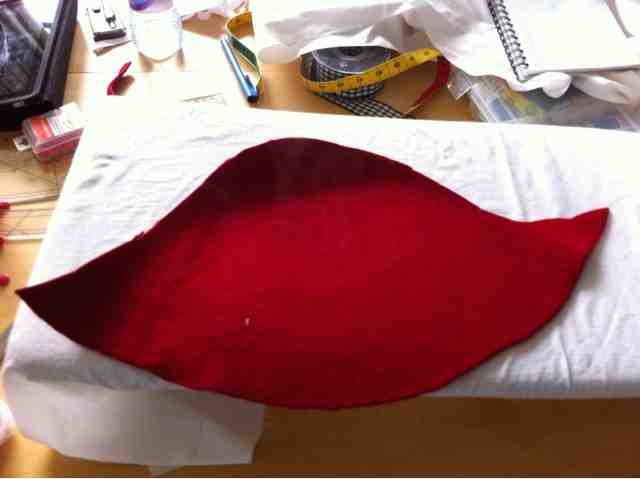
This is the other half of the hood, which I had to press flat first,  then cut out the circle for the brim.
To help get the steam into the felt I used a damp tea towel and an iron to press it over  my tailors ham.  I wanted to make it slightly down turned at the front and up turned at the back.
To attach the crown and brim together,  I cut a central circle out of the brim with a small seam allowance which I clipped and pressed upwards.
To help maintain the shape of the brim I sewed  millinery wire to the edge...
...which I then covered with black satin bias binding. To help keep the opening in the middle standing up I used the crown block and a bit more steam to mold the felt into place.
I pinned it all together to check that it all fitted together and looked good.

Having sewn the brim and crown together (stabbing myself frequently in the process-oops), The inside of the hat is finished with a petersham ribbon and a length of elastic to hold it on the head.
The best part of hat making is putting the decoration on! I really like these  pinwheel bows made from gingham ribbon.
The completed hat!
From this angle you can see the shaping of the brim.  I'm very pleased with how it turned out.
From above.