Tuesday, November 17, 2015

Limoncello, another cookbook used!

In my continuing quest to use my cookbook collection properly I finally tried a recipe from Gifts from the Kitchen.  I bought this book before Christmas a couple of years ago, with the intention of making gifts for family and friends. As usual my health had other ideas, and whilst I've read all the recipes, I never managed to actually make one. However, with Christmas coming again, I decided to try out the limoncello recipe. I doubled the amount tho, so that if it's any good I can keep a bottle for us!

It's a very simple  procedure, you peal a dozen lemons of their rind and then boil that and the juice of the lemons in a sugar syrup for a quarter of an hour.
Many lemons
Naked lemons!
The juicing of the lemons was made infinitely easier by our marvelous gadget which we call the lemon inverter, as basically you pop half a lemon in the press and squeeze the two halves together and ta-da, one inside out lemon half and all the juice in the pan. It helps having a strong husband on hand as well!
As you boil the syrup it gradually darkens to a lovely rich orange. Once it's simmered for 15 minutes or so you decant it into a Kilner jar, or other sterilised sealable vessel and add a large amount of vodka. You then leave it alone to mature for a month or so and hopefully it will taste delicious when we try it out.  I'll let you know how it turns out...
A lot of potential Limoncello :-)

Monday, November 02, 2015

Toffee nut slices and a disaster possibly averted!!


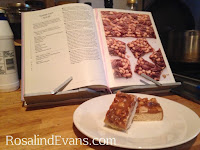
So, in my attempt to start using my cook bools properly I decided to start with one of my least used purchases- Peyton and Byrne's British Baking.  It's a beautifully illustrated edition and contains a selection of recipes from tea breads to classic British puddings, and its purple my favorite colour so of course I got sucked in by amazon and bought it at least three years ago! (It's still available at amazon here).  And I'm afraid I've only ever used one recipe for Lemon Possett, and that works really well, so I had high hopes for the Toffee Nut Slices recipe.  The recipe combines two of my favorite things- nuts and toffee (obviously!).


See how gorgeous the illustrations are.  You start the slices by making a fairly basic buiscuit base from butteer sugar and flour. This was one of my problems with this recipe, I used the exact tin specified and I ended up with a very thick base, much more so that pictured, I personally wold prefer a thinner base. so next time I will reduce the biscuit amount.  But that's just a little nigggle!


You start by toasting the nuts on the oven, watching them like a hawk as they can go from toasted to chared in a very short time! This also makes your kitchen smell amazing...
Once they are toasted and cool you rub them gently between your hands to remove any remaining skin- a surpriing amount of it comes off and would have not have enhanced the end result.
Once you've done the nuts you start on the toffee.  Now, as always be very careful when dealing with boiling sugar as it's very, very hot and easy to burn yourself! Also, it's wise to have any things that will be added to the sugar, in this case butter and cream, measured and ready to add, as trying to faff with scales whilst your toffee burns is not a happy thing! I had another problem here in that the amount of water used to dissolve the sugar is really small and as my sugar just about to burn a crisp, I added a couple of tablespoons of extra boiling water to get it to melt properly.  In all my other cookbooks that deal with toffee making, there is always more water in the recipe for a similar amount of sugar, so I would have some boiling water on had just in case your sugar starts to catch rather than melt.  Practicing making toffee is going to be something I need to do to avoid burnt sugar!


This recipe does not use a sugar thermometer to make the toffe, but instead relies on you judging the colour of the toffee-living dangerously or what!  And this is where disaster struck...  Whilst trying to take an action shot of stirring the toffee, I dropped my Iphone into the saucepan of boiling toffee...! I am blaming this on the fact that I am taking steroids at the moment so am rather jittery... that's my story and I'm sticking to it.  Fortunately Mr EB was there to help me fish it out and saved the day my cleaning it up and somehow neither of us got scalded by the hot sugar!  Even more Amazing is the fact that the phone still works!!! Totally gobsmacked by that!!

So after the little toffee apple  diversion, I added the nuts to the toffee and spread it onto the cooled biscuit base, and then bunged it in the oven for its final bake.
Once cooled, you chop it into slices and attempt not to eat all of it in one go.  It's a really moreish, but very sweet treat.  I will definitely be trying this recipe again, despite one or two little niggles with the recipe, it produces excellent results, I'll also be trying more P&B recipes to see if they are consistently this good.  One cookbook almost properly used!

Saturday, October 31, 2015

Books, books, books!

The time has come to admit I have a problem.  My problem is common in my family, we have an obsession with books.  I'm not just a bibliophile, my problem is more of an obsession with collecting books, I would say I'm a bibliomaniac!  I'm fairly certain it's genetic and I get it from both parents, so I was always doomed to love and adore books.  Whilst studying for my music degree I would source and horde books relevant (and not so relevant) to my subjects and spend more on my books than normal student purchases such as booze.  When I got really into sewing costumes my obsession moved onto fashion history and museum catalogues from the V&A filled with fabulous pictures and patterns that I could drool over when I should have been studying!  Getting into. RADA just validated my need for more sewing books and my problem only got more pronounced the more I read and bought.  Amazon has a lot to blame from my problem, they make it so easy and simple to just buy, buy, buy, with a single click and then the next gorgeous tome arrives within 24hours.  Yes I know Amazon is a dreadful, tax dodging corporate giant, but I'm only human and I have to have my book fix!  My sewing and costume collection now tops a hundred, wonderful volumes that keep me happy for hours. I've even started a catalogue so that I know what I have and what areas need more attention- I'd also love to get book plates made so my collection is obviously all mine- mwahahaha! (Maniacal book loving laugh)

My other guilty book mania focuses on cookery books.  I am a total addict and always fall for a beautiful book of glorious photos, without really paying attention to the recipes.  I have loads piled high in the kitchen and it's getting to be a problem.  But I have admitted I have a problem, and that is apparently the first step on the road to recovery-although to be honest I'm not sure I want to recover as I love my books and no one is getting them off me! However, it does seem silly that I have all these cookbooks which do get read a lot, but I haven't actually tried the recipes out, which is their purpose after all.  My sewing books get read and the patterns and techniques used a lot, not so much now my health is poor but they have all had a good use, so I don't feel so bad about them.  But I know that some of my recipe books may have had only one recipe used from them, or sometimes none at all!  So before I'm allowed to buy more recipe books, I have to properly use the ones I have... I should also use some of the stacks of cooking magazines that I've also accumulated over the years. I'm nearly as bad at hoarding them as I am recipe books!  So out with the baking tins and mixer it's time to bake and cook- watch this space for my attempts to justify my cookbook bibliomania! 

Monday, September 21, 2015

The Solace of Stitching or How to Preserve your Sanity one Stitch at a Time!

One thing that no one tells you about having a chronic illness is how much of your personality it eats away.  So many of the things that have defined my life (playing the flute, singing in choirs, dancing etc etc)  are now basically impossible, so I've been trying to find some relief in the things that I can still manage. These are mainly characterised by being hand work, such as crochet and hand sewing my hats.  The state of my health has caused me some pretty big bouts of depression and anxiety (fairly understandable when confronted with the need for a double lung transplant!)  but being able to pick up a crochet project or hat and feel the rhythm of the stitches as I form them is incredibly soothing.

When my mind is in a tumultuous mess, the repetitive nature of crochet and sewing calms me in a way that some people compare to meditation. I have tried Mindfulness Meditation as recommended by my psychologist, and I have found it helpful.  The main problem I have with it, is that it mostly focuses on using your breathing as a way of centering your thoughts in the present and not worrying about the future or the past.  I can see how this can work but when your breathing is a massive problem, focusing on it just makes me more stressed, not less! So sometimes what I need most is a task that prevents my mind worrying endlessly about all the stuff that is driving me nuts. Crochet and hand sewing hats takes enough thought and concentration that it prevents the endless spiral of depressive thoughts that are so easy to slip into.  I really do find a great deal of solace in stitching, and its not just me- a quick search on the Internet shows how many people have found relief from mental health issues using knitting, crochet, embroidery or other hand crafts as a form of meditation, for example this article from the Craft Yarn Council has numerous exampes of knitting being used as therapy for the seriously ill.  So it's not just me!

Another thing no one tells you about chronic illness is how it can leave you feeling out of control.  I find this particularly hard as CF or not, I like to know what is happening in my life and that I have a plan of what I ant to happen and how I'm going to get there. Sadly, n many ways it feels like the illness is in control, because you always have to take into account all the extra stuff that having something like CF entails.  You can't just decide for example, to go out to the cinema, you have to consider if you are up to going there, can manage the air con in the cinema (it can really set off a niggling cough)  have you got all the meds you need to have with you have you  got your insulin and diabetic contraptions and so on and so on and so on.... I'm not saying it's impossible to do things, you just have to be incredibly organised and know that there are these controlling factors to pretty much every decision you make.  I really don't like that my CF makes me feel that it is control and I am not (understatement alert!).  I'm not saying that healthy people are always in total control of their lives, but they can be pretty certain that if you do (A) then the outcome will be (B).  When you add chronic illness into the equation doing  (A)  may sometimes result in (B)  but its more likely to end up being anything from (C) to (the square root of five) and anything you can imagine in between. With something like CF at the stage I am at, you can plan and prepare all you like, but inevitably your body decides to throw a hissy fit and suddenly all bets are off.  I hate that one day I'll feel ok (at least ok my standards!) and I'll be able to do something simple like having dinner with friends and the next I can barely get out of bed cos I've got a raging temperature and I'm trying to breathe through treacle- I really cant express how frustrating this is and how angry it makes me.
Crocheting and sewing gives me some semblance of control back, I can still do these things, the way I want and and my CF can just sod off!  This gives me a great deal of satisfaction, however simple and small the project may be, its still mine.   When everyday tasks feel like insurmountable problems, actually making something from start to finish really does help prevent the feelings of  being out of control, of inadequacy and uselessness that having CF can create.  I frequently feel that I am just a huge burden on Mr EB and my family and friends.  They have never given me any reason to think that, but it's hard not to feel that way when you need so much help to do things that everyone else takes for granted.  To try and help asuage these feelings I have been searching online for articles and books that might help me learn to deal with these difficulties in a more proactive way.  One book that I absolutely adore is Ruby Wax's Sane New World.  Not only is it hilariously funny in its explanation of Wax's own metal health problems, but it includes lots of exercises based upon mindfullness, that are easy and simple to do.

Another really interesting article that  found online is by Dr JoAnn LeMaistre, all about Coping with Chronic Illness. It's actually a shortened version of a book of the same title, which is sadly out of print, but despite its relatiely short length it is a really helpful read.  She talks in depth about setting realistic expectations of what you can achieve and trying to live in the present.  If you have a chronic illness I seriously recommend reading her article, as it really does cover loads of helpful ways to cope with your reduced health.  So until I either get listed for tranplant, or by some miracle a treatment does become available for my genotype I shall be crocheting and sewing myself into some sense of sanity!  If you'd like to see some of my crochet projects, do check out my projects page on Ravelry.

Friday, July 17, 2015

1940's Style Crocheted Turban

N
When I was lindy hopping regularly, and doing a lot of historical re-enactment events, I often wished that I had a crocheted head scarf to wrap up my hair and look so effortlessly chic.  I've never managed to get the hang of 1940's victory rolls and up dos, probably because my hair is very fine and slippy so even my hair dresser had trouble with it putting up for my wedding.  In fact, I resorted to buying a swatch of extra hair so that I had enough on the day to actually get some volume!  The other main issue is that I am far too inpatient to do a proper hair set which is pretty vital to getting an authentic vintage look that will last more than five minutes.  Women working in munitions factories or other manual work during WWII usually wore their hair up and covered with a scarf to prevent it getting caught in things and getting very dirty. Rosie the Riveter is probably the most famous head scarf wearing image of the day and I have a couple of spotted kerchiefs that I wear around the house- especially when steaming hats.  I've always fancied the somewhat fancier looking crocheted ones, patterns for which were often advertised in contemporary magazines.

I found the page on the left on Pinterest, but sadly the link to the original source no longer works,. I've cut and pasted it here, and if you zoom in you can just about read the pattern, which sadly turns out to be for a knitted jumper which must be on the next page of the magazine.  It does have little diagrams illustrating how to tie it, which come in useful later, and shows just how elegant these headscarves can be.


I found this next pattern on Ravelry, another online community to which I am sadly addicted! (If you happen to be a member, my username is Rosaerona, if you'd like to see my other crocheting projects) It was created by The Spool Company, published in 1942, and makes a very fetching striped turban . It is made from a very simple mesh pattern created from treble crochet and chains (uk terms) in alternating colour rows - they suggest red, green, white and yellow, which is not a colour combination that I would go for! I used this pattern as the basis for my headscarf, but I made a slight change to the edge so that short edges are square not slightly tapering.  Not that once you've tied it you can tell because the ends are all tucked in.  I made my two coloured scarf in Ella Rae Cozy Bamboo, in pale blue and teal. It's a lovely, soft and squashy dk yarn made from 80%bamboo and 20% wool.  Fortunately for me the bamboo content it large enough that the wool doesn't set of my usual itching to it... I used two balls of each colour to make a headscarf 127x22cm (50x8.5inches)

To make a two coloured stripe scarf, using DK weight yarn and 4mm crochet hook -

  • Chain 220 in colour A, or however many even number of chains it takes you to make 127cm/50inches of chain
  • Row 1  Chain 4 (counts as 1tr and 1 chain), tr in 6 chain from hook, chain 1, *skip one chain 1tr in next chain,  reeat from * until you have used all the base chain. Fasten off
  • Row 2. Join colour B in first treble of row 1, chain 3 (equals first tr) then tr in first chain space of previous row, then chain 1.  Or you could usee a standing treble to begin the row (brilliant tutorial here on this technique, called standing double in USA terms), then tr in first chain space of previous row then chain 1.
  • *Tr in next chain space of previous row, chain 1, repeat from * all the way along working tr in chain spaces,  work an extra final treble in the last treble of the previous row
  • Repeat rows 1-2 until the piece is 22cm/8.5 inches wide.  This means all odd rows start and end with one treble and all even rows have two tr stitches at the beginning and end of the row,  
The easiest way to explain this pattern for me is this diagram of a sample of the mesh pattern which I made. I couldn't find a symbol for a standing treble crochet so I've used the usual chain 3 at the start of each row instead. Sorry its a little scrappy but I think you should get the idea-

You could make all sorts of variations on this headscarf, you could omit the colour changes and just turn at the end of each row in a single colour, or you could use more colours, or its easy to make it bigger or smaller, just adjust the length of your base chain and make as many rows as you need.  I'm going to try a plain one next.  I tend to tie mine in the way pictured on the first pattern, with the knot at the front and the ends tucked in. To do this you centre the scarf at the back of your head, so the middle of the long side of the scarf is at the base of your head.  Then bring the two ends forward and tie it at the centre of your forehead in a square knot (right over left, then left over right).  You then tuck the ends left into the part that is wrapped around your head and voila- effortless chic and a great way to cover up less than perfect hair, as can be seem from this rather awful photo of me taken wearing my scarf during my last hospital admission!
Little bit drugged up, but at least my hair is under control!


Friday, July 10, 2015

Historical Sew Monthly- June. Out of your comfort zone

Yes I know I'm late but I've been in and out of Papworth both as an inpatient and an out patient and deadlines have rather gone out of the window. I'm actually finishing this post from Papworth as my stupid lungs have landed me back here again... Oh well, I did just about manage to cobble together something for the June challenge, and I did not want to miss it completely. My May challenge will get finished when I can get home and get back to my sewing machine... Currently it's only pinned together....

So anyway, June in the HSM is Out of your comfort zone, a perfect excuse for me to finally try blocking straw.  Despite having made loads of hats I've never blocked a straw hat from sctatch.  One reason is that we didn't cover straw blocking at RADA and straw hoods are actually pretty expensive so I have always balked a bit at spending on something I might totally screw up! Also, due to my rubbish health I cant get to take all the millinery classes I'd like, so I've always wimped out of trying straw. However, with a lot of reading up (see bibliography at the bottom) and researching on the net it seemed that blocking straw is not any more complicated than blocking felt so I bit the bullet ordered myself a very nice pink parasisal cone and jumped in.  My inspiration for my hat is a charming cloche hat from the V&A made by Kilin Ltd c.1925-
I''ve admired this hat for ages, it's such a classic 1920's shape, and the decoration is so pretty. Fortunately, I had a combination of hat blocks that could make a very similar shape, I use the multiblock system by the fantastic blockmaker Guy Morse Brown, this lets you swap the brims and crowns about to get more shapes without having to buy new blocks for each hat.
To block straw you only need to dampen the straw for it to become malleable. I sprayed the inside of the cone liberally with water and left it for a couple of minutes to soften then pulled it over the block.  The straw cone will either have a cross or a button at the centre top- where the weaving process starts.  Mine had a cross, which you want to centre on the top of the block with the X running at 45degrees to the centre line. This will give the maximum flexibility to the most curved areas of the block.
Cross running at 45 degrees
Once you've centred the cone you then gently but firmly, pull the cone fully over the block and secure it with pins under the brim. You start by securing it at the CF and CB, then the two sides. Then pin half way between these four pins spreading the fullness even around the circumference.
Many, many pins
It's a little weird seeing the way the straw moves and stretches as you pull it, because the straw has an clear weave its much more obvious how the fibres are adjusting-unlike felt where you really can't see the stretching at all.  To ensure a snug fit around the join from crown to brim I used a wide elastic band to hold it in place.
Once the straw was dry I gave it a good iron to set the shape and try and get some creases out. Unfortunately the way it was posted left it very crumpled but I got the worse creases out. I then painted it with two coats of water based stiffiner- one inside and one outside. The finishing was then very similar to a felt or sinnamay hat- blanket stitch millinery wire round the brim edge and then cover that with petersham ribbon. To make the petersham conform closely to the curve of the brim I first pressed it in half along its length and then pressed it into a curve- this is often referred to as 'swirling' which I think sounds a lot more fun then it actually is! The decorative panel was created from more petersham and the flowers were made from felt off cuts. Sadly, I've not had time to fully secure the panel in place but I managed to get a few mock up shots done before I was dragged in to Papworth. They are not good pictures being taken with my iPhone in fairly rubbish light, but I really wanted to have something to share for once...


I think I made the panel too big if I'm honest and may change it in the future to something I'm more likely to wear as I'm really pleased with the basic straw cloche part, although I need to get some more creases out next time. No longer shall I be afraid of straw and next time I'll buy an even nicer one! 

The Challenge: June- Out of your comfort zone
Fabric- Parasisal straw cone, petersham, felt
Pattern- Hatblocks from Guy Morse Brown
Year- 1919
Notions- Thread
How Historically accurate it it? Some of the felt is not 100%wool so not period accurate-90%
Hours to complete: Approx 10 hours exclusive of drying time
First worn: Not worn yet as I'm stuck in hospital....sigh...
Total cost: Straw Cone £23.26, Petersham £4.50, rest from stash = £27.76


Bibliography
Classic Hats EBook from How2hats.com
Hats! Making classic hats and headpieces in fabric, felt and straw.  By Sarah Cant
Fashion Hats. By Karen Henrikssen
From the Neck Up.  By Denise Dreher

Friday, June 12, 2015

Musings on MacarOn, MacarOON!

My favorite treat from the village bakery when I was little were the giant, chewy, almond macaroons with rice paper on the bottom, which at that age were about the size of my head! In recent years the macaron (note spelling!) has become a massive baking trend, and I do really like them but I certainly do not have the patience to make them as beautifully as you see them in fancy patisseries.  Whilst the basic ingredients are the same for the two, ground almonds, sugar and egg white, the way you blend them is different and for me that's what makes the difference between macaroons and macarons. You could also argue that macaroons are the English version of French macarons, as I have never seen macaroons in any french recipe book that I've read. Although, if you are going to get into baking geography the Italians might want to chip in with the fact that the word macaron is derived from the Italian macarone or maccherone which means meringue and is what macaro/ons are both basically made of.  For some people, macaroons are in fact made with shredded cocnut and not nuts at all, but seeing as I loathe shredded coconut with a passion, you won't find any of that nonsense on this blog!  

Beautiful Laduree Macarons
Both confections are made by whipping egg whites with sugar to form a meringue base and then folding the almonds into this very gently to maintain the airiness of the batter so that they do not collapse when baked. I have tried making macarons several times with varying degrees of success. To get the distinctive crisp, smooth shell and a sort of ruffled bottom (that aficionados call its foot), macarons are usually made with very finely ground almonds, or almond flour and icing or confectioners sugar. This results in a much smoother mixture and also creates the distinctive shiny finish.  Two of these shells are then sandwiched together with butter cream (mmmm...) To make the classic Laduree macaron the shells have to be the same size which means you have to pipe the mixture out onto the baking sheets and I am just not patient enough for that!  Also, it makes so much more washing up and I inevitably get bored half way through the piping, which means I get sloppy, and I end up with different sizes, which then annoys me!  So whilst I can appreciate the beauty and deliciousness of the macaron, I will probably be a receiver and eater of them rather than a creator!

Macaroons on the other hand are so much easier to make and far harder to cock up- vital aspects for an easily bored baker like me!  This recipe is based on one I found in one of my Mum's ancient Reader's Digest cook books, but tweaked a bit to make the macaroons even more chewy.  Its very easy to scale the recipe up or down to however many egg whites you might happen to have.  One quantity of the mixture makes approximately 12 about 5cm in diameter.  I usually make 3 quantities, as these don't hang around for long!

Ingredients
1 egg white
3 oz caster sugar (90g)  If you have it use vanilla sugar.
2 oz ground almonds (60g)
Halved almonds to finish- one for each macaroon
Rice paper
(if you cant get rice paper use bake-o-glide on your baking trays as nothing sticks to it! You could try using baking parchment, but you may find they stick to it.  Seriously get some Bake-o-glide you can use it over and over again so it is totally worth it)

- Pre heat oven to 180C
- Line baking trays with rice paper or Bake-o-glide (the number of trays will depend on how much mixture you make)
- Beat the egg whites until they form stiff peaks.  If like me you sometimes have trouble telling if your egg whites are at stiff peak stage and panic about over beating them, then check out this post at the marvelous Joe Pastry website. The pictures and descriptions are great- no more under or over-whipped egg whites!  Unlike with macarons it's not the end of the world if you don't get the beating exactly right.
- Once you reach stiff peak stage, continue beating adding the sugar a tablespoon at a time allowing each one to combine fully before adding the next.
-  The mixture will become beautifully shiny and thick.  This is a basic meringue mix.
Would love to just stick my head in this bowl!
-  Gently fold the almonds into the meringue mix, trying not t deflate it too much.  A metal spoon or rubber spatula is ideal for this.  The mixture should be still quite stiff and thick, of you over stir it, it will get more liquid.  This isn't the end of the world it just means the finished macaroons will not rise as much and will probably spread more so will be thinner and crispier, but still yummy!
Fully folded mixture
- Using a couple of teaspoons, dollop the mixture out onto the rice paper, allowing space around each as they will spread a bit.
- Finish each macaroon with a half almond.
- If you want the macaroons to by extra golden you can brush the tops with egg white, but you don't have to.
Ready for baking
-Bake for about 12 minutes, but watch them like a hawk as they go from golden to burnt very quickly!  I was not eagle eyed enough and you can see a couple got a little bit crisped!

- Gently pull off the excess rice paper and then let them cool on a wire rack.

All done
And that's it really, except to eat and enjoy.  They'll keep for a few days in an airtight box, but mine usually disappear within 48 hours...

Monday, May 11, 2015

It's a hard knock life...

Yes, I've been reduced to quotes from musicals to express myself... I've never wanted this blog to be all about how shit having cf is, as for one thing I think its pretty obvious, and I've always lived in mortal fear of people thinking I am trying to get their sympathy... Fortunately, I think the number of people who read this blog are so negligible (don't ask me about how depressing my google stats are!) that probably no one will notice:-)

So anyway, I've been having a hell of a lot of ivs recently, its been pretty much every 3 weeks for several months and sometimes less...So I had to have one of 'those' conversations with the consultant last clinic, and I have been rather forced to confront some home truths.  'Those' conversations are the ones that you have about the big scary things, like the fact that the "drugs don't work" very well anymore (now it's 90s grunge songs), and I'm rather running out of options, so transplant is rearing it's ugly head once more.  You may well make it through the conversation without dissolving into a puddle of angry tears, but later on you have to actually face the facts, and I really don't want to.  My declining health has been so gradual that I find it hard to recognise the fact that I am this sick- sick enough to need a double lung transplant in the not too distant future.  I know that sounds daft, but it's only when I actually sit down and think about my daily life that I realise how much I'm struggling- physically and mentally.  Putting off going upstairs until you absolutely have to, because you don't want to cough your lungs up is not normal in a 34 year old.  Not being able to speak without getting out of breath- ditto.  Having to make other people walk at my pace cos there is no way I can go at theirs.... The list could go on, but frankly it's too depressing. But all this has occurred so slowly that it has just become 'normal' for me. If I had gone from being well to suddenly being really ill then it would be a lot easier to realise where my health is at now.  Cf is such an insidious disease that when you do finally confront what it has done to you, it is almost surprising! 

We've not given up completely just yet tho.  The consultants and I have a plan! Next time I need ivs, we are going to try and desensitise me to some of the meds I've previously been allergic to, which I'll have to have as an in patient sadly.  But it may mean that we can try some new treatment options and hopefully get a little bit longer off ivs, which would be really nice. So to try and alleviate the boredom I'm going to plan and get materials for a couple of crochet projects, and make some hats that I can then trim whilst incarcerated.  We have also just completed the purchase of a bungalow, that once we've done it up a bit (ok a lot!) will hopefully make my everyday life a lot easier and less stressful.  I'm also rather enjoying designing all the fun things we 're going to have in the new house, with Mr EB of course!   I'm not going to just stop living and doing things and being me, because my body is being difficult. 

Tuesday, April 14, 2015

HSM15 April- War & Peace

The April challenge for the HSM15 is War and Peace.  The extremes of conflict or long periods of peacetime can both influence what people wear, so for this month we have to make something that shows either the effect of war or peace. My chosen period is WWII

A little bit of info about WWII fashion and rationing.

Whilst food rationing had been in place since 1940, the imposition of clothing rationing was not announced until 1 June 1941.   With Great Britain effectively cut off from all supplies from Europe and a greatly diminished supply route from the USA, rationing sought to ensure a more equal distribution of what was available.  Each kind of clothing was allocated a 'points' value, which was based on how much fabric it took to make and how much labour went into its manufacture.  For example, a wool dress took 11 coupons compared to 2 for a pair of stockings or 8 for a pair of men's trousers.  Each adult had an allowance of 66 points to last a year, but as war production increased in the run up to D Day, the allocation shrank to just 24 during 1945-6. Customers had to plan how they would use their points very carefully, and the government constantly reminded the population of the complex and difficult choices they had to make to make their clothes last.  


Photo credit Wikipedia
Of course, the customer still had to pay for the garment as usual, but every type of clothing had the same points value regardless of the quality of the garment. So, a coat of cheap fabric would cost the same number of points as a robust coat which would last a lot longer. Wealthier customers were therefore better served by the rationing system, especially considering clothing prices were generally higher during the war due to the shortage of fabric and materials being commandeered for the war effort. To try and combat these problems the government introduced the Utility Scheme also on June 1st 1941, to ensure that low and medium quality consumer goods were produced to high standards at reasonable prices. Clothes made under the scheme were identified by the CC41 label an abbreviation of Civilian Clothing 1941 (the holy grail to vintage collectors!).  They were made with fabric that had a set specification of weight and weave called Utility Cloth.  

As well as rationing the number of clothes people could buy, the actual designs of garments were governed by strict rules.  The Making of Civilian Clothing (restriction orders) was passed in 1942; this forbade the wasteful cutting of clothes and set strictly enforced limits that tailors, dressmakers and home sewers, had to abide by.  The restrictions were extensive for example, a dress could have no more than 2 pockets, 5 buttons, 6 seams in the skirt and only 2 inverted or box pleats, or 4 knife pleats.  No unnecessary ornamentation or decoration was allowed.
Utility Suit designed by Inc Soc.1942
 Collection of the V & A.
 
To demonstrate that these limitations were not an end of style and fashion, the Board of Trade employed a group of London's top fashion designers, including Hardy Amies and Royal favorite Norman Hartnell, to create a year round collection. The Incorporated Society of London Fashion Designers or Inc.Soc as they became known was founded in Jan 1942.  They produced designs that could be made with a limited amount of fabric e.g. 1.8 metres for a dress, which resulted in an emphasis on line and cut and also reduced the cost. Whilst government standardised fashion had not been seen as a good idea by many, the fashion press appreciated the new collection of attractive, affordable clothes.  British Vogue praised them for being elegant, simple designs that were eminently wearable - 'All women have the equal chance to buy beautifully designed clothes suitable to their lives and incomes'.  An example of Inc Soc design can be seen in the beautifully tailored suit pictured above from the V&A's collection.  It was probably designed by Elspeth Champcomunal in 1942 (Inc Soc designers were not always given direct credit, to prevent favouratism).  It exemplifies the tailored, slim line silhouette, with pronounced shoulders and a nipped in waist (reminiscent of the uniforms worn by the forces) that became the standard wartime look.  It is also beautifully made and finished from a hard wearing woolen tweed.  The scheme proved to be extremely successful, by the end of the war about 85% of all civilian clothing and fabric bore the utility label.


Photo credit Imperial War Museum
Perhaps the most famous response to the rationing of clothing was the Make do and Mend campaign.  The campaign 'was not merely designed to revive the lost arts of darning and patching, but to raise morale by showing how old clothes can be turned into really smart and attractive new ones'  Posters and leaflets, such as the one pictured,  encouraged women to go through their old clothes (and their husbands old clothes) and repurpose them for themselves and their children.  Another important facet of the campaign was teaching people to care for and repair clothes they already owned to make them last longer and preserve the precious coupons.  Women became ever more imaginative and creative in recycling, and renovating old clothes and creating stylish, home made accessories. The government was genuinely concerned with maintaining the morale of the public, particularly women who were vital for the war effort.  By 1945 2.2 million women were working in war industries, building everything from ships to aircraft.  Maintaining their personal appearance was vital to keep morale on the home front high.


Ok, so that's quite a lot of background info on rationing! As you can tell I find this period of fashion history somewhat fascinating.  I have always been in awe of the women of this period such as my Nan, who maintained their own style with such creativity and ingenuity. I wanted to make something that one of them might have actually made and worn so decided to use an actual pattern that was available during in 1942. I first saw the pattern (pictured left) in one of my many costume history books -The 1940's Lookbook by Mike Brown.  As with so many period publications you can now find a copy of the original online.  This pattern is available to download from Etsy here for the bargain price of £2.08. It's really very simple to follow and I made mine entirely from scraps of felt I had left over from my hat making, so definitely coupon friendly!  I'm not quite sure exactly what I am going to use them for, possibly a brooch as suggested in the pattern, but I rather like them on the boater I used as a background in the pictures.  Either way I am very pleased with how they turned out and will definitely be making some more.


The Challenge: War and Peace
Fabric: Felt
Pattern: Bestway, Buttonhole and Necklace
Year: 1942
Notions: Thread,  Safety Pin
How historically accurate is it? 95% I didn't follow the pattern to the absolute letter
Hours to complete: 2 hours
First worn: Not yet worn
Total cost:Nothing -all from stash